Exposure and white balance: three multipliers in linear light
By Anastasiia Butova, ComfyUI and diffusion-model engineer, Belgrade · published 23 September 2026
In the colour studio I am building, exposure and white balance are one operation: three multipliers on linear RGB. Everything interesting sits around that multiply. Which values count as linear, what the gains are normalised to so a grey keeps its brightness, and what the engine does when a channel runs past 1. This is the first part of a series on how the basic colour tools are implemented, with the maths, the C++ and the mistakes the tests caught.
The engine and the space it works in
The studio is a local editor built on LUT Atelier, a colour editor I wrote first in my research hub and then pinned into the studio by the SHA-256 of every source file. Several fixes described below went into that engine after the pin. The native side is C++20 and uses only the standard library; the one third-party file is nlohmann/json 3.12.0, vendored for the command-line protocol. The JavaScript copy of the maths stays alive as an independent oracle: a seeded run over 600 random grades compares 196,200 output values between the two engines, and the largest difference is 8.7e-14.
The input is honest about what it is. JPEG, WebP and 8-bit PNG arrive through the browser canvas as 8-bit sRGB. A separate lab window reads 16-bit PNG without letting the canvas round it. There is no RAW decoder, no HDR and no ICC profile other than sRGB. The colour transform computes in double and rounds only when it writes the output.
sRGB values are encoded, not linear. The engine decodes each channel with the IEC 61966-2-1 curve before any multiply:
c_lin = c / 12.92                      if c <= 0.04045
c_lin = ((c + 0.055) / 1.055)^2.4      otherwise
A mid-grey of 0.5 decodes to 0.214. That number is the reason for most of this article.
The order of a grade inside the engine, from native/src/color.cpp:
- Input stage: checker Levels or an imported LUT, blended by one strength slider.
- Decode to linear, then multiply by white balance, exposure and temperature/tint gains.
- Optional Oklab edits (hue, saturation, colour pins, reference match), then back to encoded RGB.
- Contrast, master curve, R/G/B curves.
- Photo stage: Levels, luma curve, tone sliders, vibrance, grading wheels, selective colour.
- Channel mixer, colour protection, global strength.
Exposure is a multiply, so it lives in linear light
Exposure is 2^EV applied to linear RGB. +1 EV doubles the light, −1 halves it, and the slider runs from −3 to +3. The reason it has to happen in linear values is physical: twice the light is twice the linear signal. It is not twice the encoded code value.
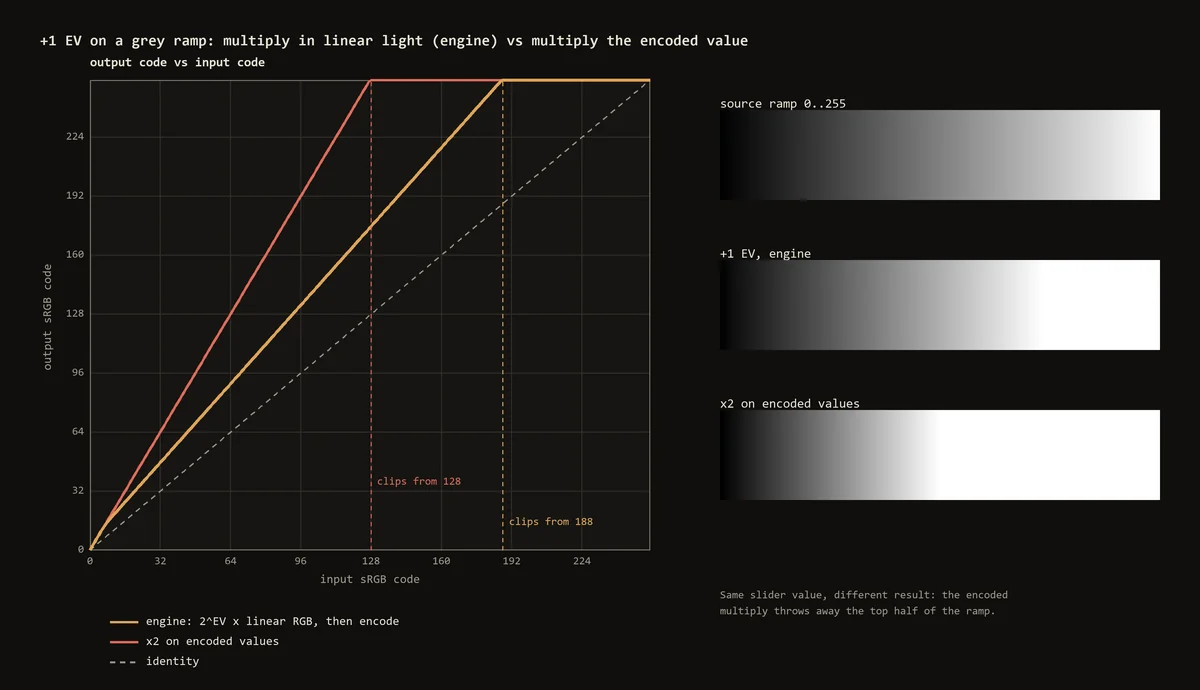
The figure is sampled from the engine itself. At +1 EV, input code 128 comes out at 175.6, and white is reached from input code 188. If you multiply the encoded value by two instead, everything from code 128 up becomes white and the top half of the ramp is gone. Adobe documents Photoshop's Exposure adjustment as a calculation in linear colour space, and Lightroom describes +1.00 as roughly one f-stop. I do not claim their formula; the multiply is simply what the word means.
Here is the whole path in C++. Exposure and temperature/tint are folded into one gain vector once per grade, and the pixel loop does three multiplies:
// native/src/color.cpp
Vec3 linearGains(const Grade& grade) {
  const Vec3 warm{1. + grade.temperature * .4, 1. + grade.tint * .25, 1. - grade.temperature * .4};
  const double exposure = std::exp2(grade.exposure), y = linearLuminance(warm);
  return {exposure * warm[0] / y, exposure * warm[1] / y, exposure * warm[2] / y};
}

Vec3 workLinear(Vec3 original, const Grade& grade, const std::optional<Cube>& lut, Vec3 gains) {
  // ... input stage: checker Levels, then the imported LUT, blended by importedStrength ...
  return {srgbToLinear(original[0]) * grade.wb[0] * gains[0],
          srgbToLinear(original[1]) * grade.wb[1] * gains[1],
          srgbToLinear(original[2]) * grade.wb[2] * gains[2]};
}
The documented invariants are plain. EV 0 is a multiplier of exactly 1, and the maths suite checks that +1 EV doubles linear RGB with zero error. +1 followed by −1 returns the input wherever nothing clipped: on the grey ramp I measured a round-trip error of 4e-14 of a code.
White balance: the same multiply, per channel
White balance here is a diagonal scaling of linear RGB, the von Kries model: one gain per channel. The gains come from two places. The neutral picker writes wb, and the temperature and tint sliders produce relative multipliers:
w = (1 + 0.4·T,  1 + 0.25·t,  1 − 0.4·T) / Y(w)
Y(w) = 0.2126·w_R + 0.7152·w_G + 0.0722·w_B
The division by Y(w) is the part I got wrong first. Without it, tint +1 multiplies green by 1.25, and a grey gets brighter by log2(1.179), about 0.24 EV; tint −1 makes it darker by 0.28 EV. So a slider that is supposed to change colour was also changing exposure. With the division, temperature and tint recolour a neutral without changing its linear luminance. I ran a mid-grey through tint +1: it comes out as (118.1, 131.0, 118.1), and its linear Y equals the input's to the last bit.
The compass that drives these sliders is a picture of two bounded numbers, not a thermometer. The marker sits at x = cx + R·tanh(temperature), y = cy − R·tanh(tint), and dragging inverts it with atanh, clamped at 0.7615, just under tanh(1), the end of the slider range. There are no Kelvin on it. Lightroom shows Kelvin for raw files but a relative −100…+100 scale for other files; Capture One shows Kelvin and tint. A JPEG has usually been white-balanced once already, in the camera or the raw converter, and without a camera profile there is nothing to convert Kelvin through. A relative scale is the honest one.
The neutral picker keeps the brightness of what you clicked
Click a grey patch, and the engine decodes it to linear (r, g, b) and sets
g_c = Y / c, Y = 0.2126·r + 0.7152·g + 0.0722·b
After the multiply all three channels equal Y, so the clicked point becomes a grey of its own luminance. The version I pinned normalised to the geometric mean (r·g·b)^(1/3) instead. That keeps the product of the gains at 1 and sounds neat, but the clicked point got brighter or darker: 0.30 EV for the test pick (0.6, 0.45, 0.3), and about 1.06 EV for a greenish pick such as (0.3, 0.6, 0.3). A colour tool was silently moving exposure again. The luminance version landed on 22 September, and the JS and C++ engines agree on it bit for bit on the check set.
// native/src/color.cpp
Vec3 neutralGains(Vec3 rgb) {
  if (!finite3(rgb) || rgb[0] <= 0. || rgb[1] <= 0. || rgb[2] <= 0. || rgb[0] > 1. || rgb[1] > 1. || rgb[2] > 1.) throw std::range_error("neutralGains requires finite encoded sRGB channels in (0, 1]");
  const Vec3 linear{srgbToLinear(rgb[0]), srgbToLinear(rgb[1]), srgbToLinear(rgb[2])};
  // g_i = Y / c_i: the pick becomes a grey of its own luminance (see color-core.mjs neutralGains).
  const double y = linearLuminance(linear);
  Vec3 gains{y / linear[0], y / linear[1], y / linear[2]};
  for (double gain : gains) if (!std::isfinite(gain) || gain > 8.) throw std::range_error("neutralGains pick needs a gain above grade.wb limit 8: it is too dark or too far from neutral");
  return gains;
}
A successful pick also sets temperature and tint back to zero, so the gains on screen are the whole balance. A pick that would need a gain above 8 is refused with that message, and a pick with a zero channel with a message of its own. I prefer a refusal to a clamped gain, because a clamped gain produces a result that looks like the tool worked when it did not. The test case in the suite is a strongly tinted sample that needs gains of (4.40, 1.10, 0.24); after the multiply its channels are equal, with a spread of exactly zero.
What you click matters more than the formula. One photograph cannot separate the colour of the light from the colour of the object: the linear signal is I_c = k·∫ E(λ)·R(λ)·S_c(λ) dλ, and multiplying the light E by any spectral function while dividing the reflectance R by the same function gives the same pixel. So the picker belongs on a grey card or a surface you know to be neutral, never on skin or on a "white" T-shirt of unknown dye. For the same reason there is no automatic white balance in the engine yet. Every automatic method rests on an assumption, and the classic grey-world assumption turns a scene that really is green into grey; the research checks keep that counter-example on purpose.
What is implemented for known neutrals is a Chart Check panel: one known neutral patch, its encoded and linear RGB, the gains and the residual after them. For the patch itself the residual is zero by construction, so the useful check is the other neutrals in the frame, read on the RGB parade. A solver for several patches (the median of per-patch ratios) is written down and not built. Patches that disagree are not averaged into a hidden "ideal" balance; the disagreement stays visible on the parade.
An order I have not changed yet
In the current engine the imported LUT runs before white balance and exposure. For a look LUT that is the wrong way round: you want to normalise the frame first and apply the look second, otherwise the same look lands differently on every frame of a series. I have not flipped it, because flipping it silently would change every saved project. It needs a versioned recipe, where old projects keep the old order and new ones get the new one. Until then the neutral picker reads the pixel after the input stage, so its gains at least refer to what the multiply actually receives.
What happens past 1.0
The engine is SDR. With exposure and white balance alone, each channel is encoded and clamped to [0, 1] right after the multiply; with Oklab edits active the clamp comes later, at the latest when the result is written. Two things follow, and both are visible.
First, clipped detail does not come back. Lowering a curve after exposure only darkens a flat 255; the values above it were thrown away one stage earlier, and the exposure tool's documentation says so.
Second, a per-channel clip changes the hue. When the red channel reaches 1 and green and blue keep growing, the colour slides towards yellow.
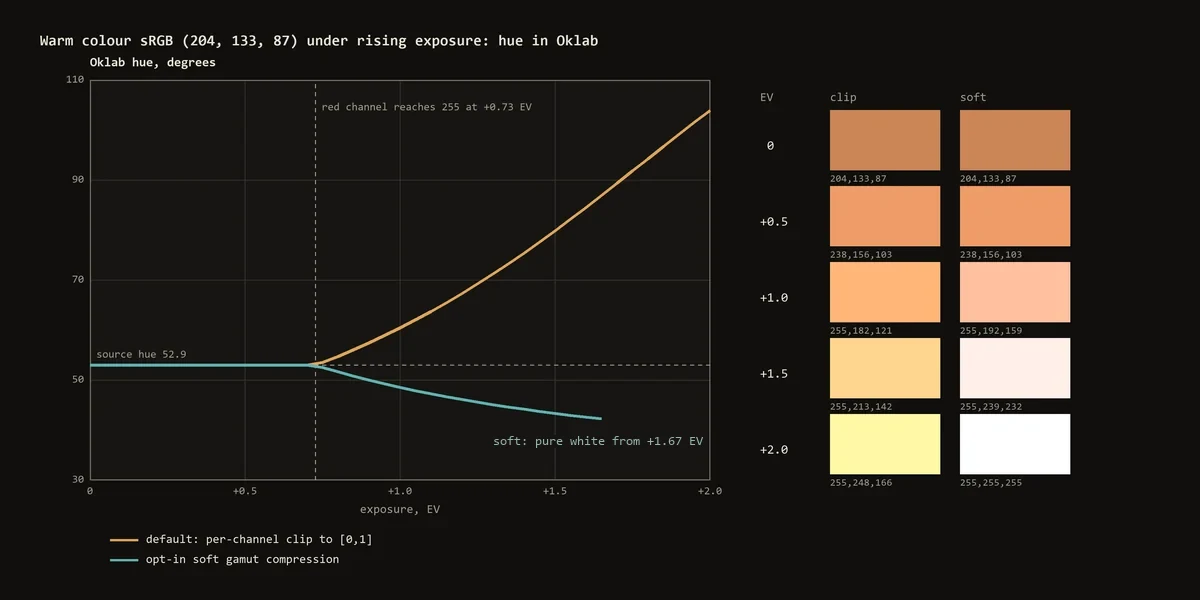
The numbers are from the engine. A warm sRGB (204, 133, 87) has an Oklab hue of 52.9°. Its red channel reaches 255 at +0.73 EV. At +1 EV the output is (255, 182, 121) and the hue is 60.4°; at +2 EV it is (255, 248, 166), hue 103.9°. An orange became a pale yellow.
There is an opt-in alternative, soft gamut compression. Instead of cutting each channel, it moves an out-of-range colour towards the grey of the same Oklab lightness, along a straight segment in linear sRGB, until it fits the cube. After a creative Oklab edit on a colour that started inside the cube, at least the first 80% of the distance to the boundary stays exact and only the rest is compressed with an exponential shoulder. With exposure alone the reference point is the exposed colour itself, already outside, so there it is a plain projection onto the surface. On the same warm colour, +1 EV gives (255, 192, 159) with hue 48.5°: the hue moves less, but chroma drops from 0.115 (the hard-clipped result; the source colour has 0.107) to 0.085, and from about +1.67 EV, where Oklab lightness reaches 1, the result is pure white. Neither option is highlight recovery.
The first version was the textbook one: keep Oklab lightness and hue fixed and reduce chroma along that ray. It fails near blue. On the blue side a fixed-L, fixed-hue ray can leave the gamut and re-enter it, and a map that must be continuous cannot jump that gap. The small re-entry near 264° is my own measurement with the engine's matrices, not his: Björn Ottosson's Oklab article says an early fit folded the blues inwards, and that he constrained the final Oklab so they do not. The soft option's Oklab framing, and its warning against hard RGB clipping, come from his gamut clipping notes. The linear-RGB segment towards a same-lightness grey has a single crossing because the RGB cube is convex, so continuity comes for free. It has a cost I measured: on a bright warm ramp at +0.8 EV, neighbouring 8-bit input codes can land 19 output codes apart. That is a steep response, not a jump; the test allows up to 20 and fails at 21.
Capture One documents highlight recovery that can use the channels that have not clipped. That works on raw data with headroom. With 8-bit sRGB input there is nothing above 255 to recover, so I would rather show the clip honestly than invent detail.
Limits, and what I would do again
- 8-bit SDR sRGB in the main window, 16-bit PNG only in the lab window. No RAW, no Kelvin, no ICC.
- White balance from one known patch; several patches and automatic estimation are designed, not built.
- The imported LUT still runs before white balance. The fix needs a versioned recipe.
What I would do from day one next time: divide temperature and tint by their own luminance, keep a second implementation of the maths as an oracle, and let the picker refuse a sample with a reason instead of clamping its gains.
Next part: Levels, histograms and black and white points by chart, where the same engine works in encoded values on purpose. The on-device C++ retouching plugin I ship for Photoshop is described on happyin.ai.