Hue, saturation and lightness by colour range, computed in Oklab instead of HSL
By Anastasiia Butova, ComfyUI and diffusion-model engineer, Belgrade · published 23 September 2026
Curves change every colour that shares a tone. The tools in this part change only some colours: push the greens towards yellow, darken the sky, leave the skin alone. Photo editors usually call this family HSL. In my colour studio none of it runs in HSL. Below is how a colour range is selected, why the edit happens in Oklab, how lightness moves without dragging the hue along, how skin and greys are protected, and two bugs that the first version of the maths had.
Where the code comes from
The engine is LUT Atelier, an earlier editor of mine from my private hub repository, pinned into the studio at commit fd96f16 with a SHA-256 for each of its 87 files (one of them the vendored nlohmann json.hpp); part 1 tells that story. The colour maths is C++20 on the standard library. Where a public product gave me an interface idea, I name it and do not claim its algorithm.
Why not HSL
HSL and HSV are fine for a colour picker and bad for editing. HSL lightness is arithmetic on encoded channels, (max + min) / 2, so pure red, yellow, green, cyan, blue and magenta all have HSL lightness 50 %. In Oklab their lightness runs from 0.45 for blue to 0.97 for yellow. A slider that promises "lightness +10" in HSL does visibly different things to different hues, and a hue rotation at constant HSL lightness turns a light yellow into a dark blue.
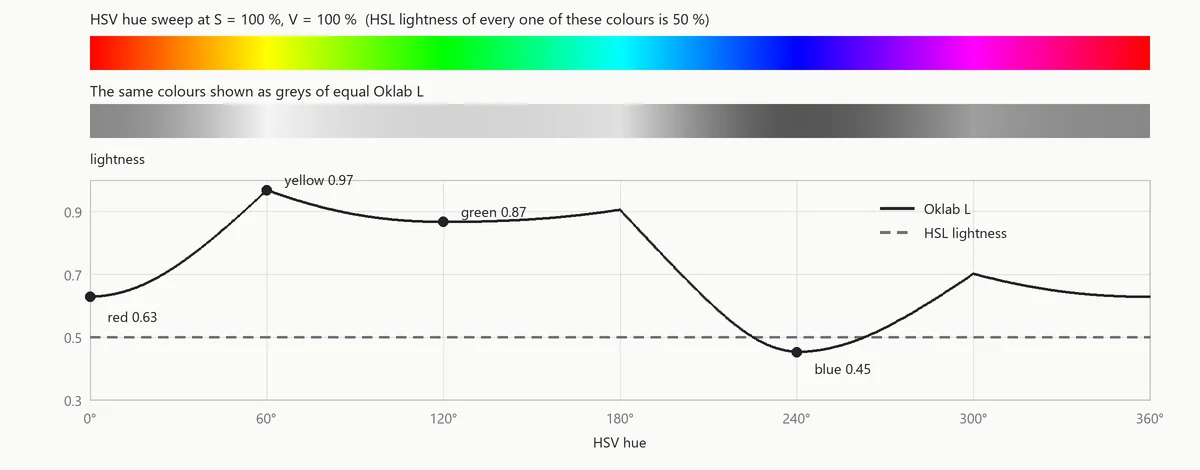
The engine does contain an rgbToHsl function. The only module that imports it is view code, and no edit calls it. Every range tool works in Oklab, Björn Ottosson's space: L is lightness, and (a, b) give chroma C = √(a² + b²) and hue h = atan2(b, a). Ottosson lists this exact job among its goals, raising saturation while perceived hue and lightness stay put, and he points out that CIELAB predicts blue hues badly. Blue is where a hue edit usually shows its seams.
One property I use directly. Oklab is a matrix, a cube root and a second matrix, so multiplying linear RGB by k multiplies L, a and b by the cube root of k. The ratio C/L and the hue do not change with exposure. I checked it on a warm colour at k = 2: every coordinate scaled by 1.2599, C/L stayed at 0.1531 and the hue at 53.42°. This is why the skin weight further down uses C/L rather than C.
Six hue sectors with a soft edge
The range tool has six sliders for lightness and six for hue. Their centres are the Oklab angles 0°, 60° and so on to 300°. These are angles, not colour names: pure sRGB red sits at 29° in Oklab, yellow at 110°, blue at 264°. So the interface draws a strip of the real hues under each slider instead of calling one of them "red".
Each sector has a raised-cosine weight that falls to zero 60° from its centre:
w_i = 0.5 · (1 + cos(π · d_i / 60)) for d_i ≤ 60°, otherwise 0
where d_i is the circular distance from the pixel's hue to the centre. Two neighbouring weights always add up to 1, so a colour between two sectors gets exactly one full edit, split between them. The cut at 60° matters: cos(π·d/60) repeats every 120°, and without the cut the 0° sector would also act at full weight on 120° and 240°.
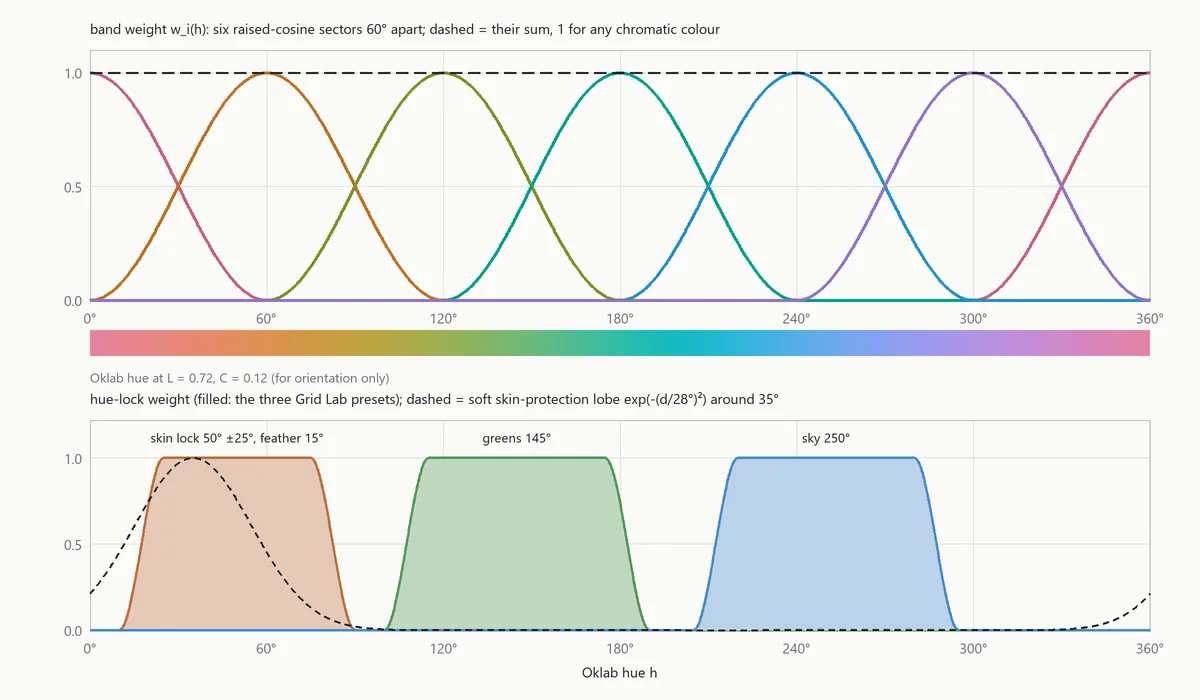
Near grey the hue angle is noise, so the edit is also multiplied by a chroma gate q(C) = smoothstep(0.015, 0.05, C). A grey with a faint accidental tint does not get lightened as if it were orange. The loop in the creative stage of color.cpp:
if (hasBands) {
  const double chromaWeight = smoothstep(.015, .05, chroma);
  double deltaHue = 0.;
  for (int i = 0; i < 6; ++i) {
    const double distance = hueDistance(hue, i * 60.);
    if (distance > 60.) continue;
    const double weight = .5 * (1. + std::cos(kPi * distance / 60.)) * chromaWeight * amount;
    out[0] += grade.bands[i] * weight;
    deltaHue += grade.hueBands[i] * weight;
  }
  if (deltaHue != 0.) {
    const double angle = deltaHue * kPi / 180., cosine = std::cos(angle), sine = std::sin(angle);
    const double a = out[1], b = out[2];
    out[1] = a * cosine - b * sine; out[2] = a * sine + b * cosine;
  }
}
Two decisions are visible here. hue and chroma come from the base colour, before any other creative edit, so an earlier hue rotation cannot move a pixel under a different slider. And the hue shifts of all six sectors are summed first and applied as one rotation, which leaves L and C untouched at this stage.
Lightness without a hue shift
A lightness slider adds up to ±0.2 to Oklab L and leaves a and b alone. A hue slider (±30°) rotates (a, b) and leaves L alone. The global hue and saturation controls follow the same rule: saturation scales the distance from the neutral axis, hue turns the angle. The maths check (npm run check:math) measures it: after a global hue and chroma edit, the change in Oklab L is 0 and the chroma error is 2.7 × 10⁻¹⁵.
That holds at the creative stage, and I do not claim more. After it come soft gamut compression, contrast, curves, the photo stage and the channel mixer. When soft compression is switched on (Grid Lab enables it for new grades), it moves an out-of-gamut colour towards the grey of the same L in linear RGB, because the fixed-L, fixed-hue Oklab ray is unsafe near blue; part 1 explains why. At least the first 80 % of the distance from grey to the gamut edge stays exact. Past that knee the compression does shift L and hue slightly, and the documentation says so rather than pretending the invariant survives.
Protecting skin and greys
There are three protections, and they are not equally strong.
The soft sliders only weaken the creative stage. Their weights are:
neutral = 1 − smoothstep(0.015, 0.12, C)
skin = exp(−(d(h, 35°) / 28°)²) · smoothstep(0.015, 0.06, C/L) · smoothstep(0.005, 0.025, L)
and the creative edit is scaled by 1 − max(neutralStrength · neutral, skinStrength · skin). The earlier version gated skin with a threshold at L = 0.35, which quietly left dark skin unprotected. Switching to C/L removed the threshold; only the zone right next to black, where hue is unreliable, fades out. Saved projects with skin protection now protect dark colours more strongly, and the change was made on purpose. These numbers are my engineering heuristics, not a published skin model and not a classifier. A warm brown sofa sits inside the lobe, and skin under coloured light can fall outside it. The test covers the maths on sample colours, not recognition on a set of portraits.
Hue locks are stronger. Each has a centre, a half-width of full protection, a feather and a minimum chroma, up to twelve of them. The Grid Lab presets are skin at 50° ±25° with a 15° feather, greens at 145° and sky at 250°; the pipette creates a narrow lock of ±12° with an 8° feather. The weight is taken from the original pixel, and the blend back happens once, at the very end:
out = original + (processed − original) · strength · (1 − maxProtection)
So a locked colour returns to its exact source RGB whatever the LUT, white balance or curves did, and the imported LUT cannot change which pixels count as protected.
The first bug lived here. Converted from sRGB to Oklab, a pure grey came out with a tiny chroma, 3.7 × 10⁻⁸ at white and less for darker greys, and a hue of 89.9°, so any lock with minimum chroma 0 whose range covered 90° protected every grey in the frame. The fix takes its threshold from CSS Color 4, which treats OkLCh hue as powerless at C ≤ 0.000004. Below it a pixel has no hue, and a hue lock cannot claim it. The check now converts 256 sRGB greys: the largest chroma is 8.5 × 10⁻¹¹ and every lock weight is 0.
The chord that cut through grey
Protection and feathered selections both apply an edit "partly". The first version did the obvious thing: compute the fully rotated (a, b), then mix it with the original (a, b) by the weight. That mix runs along a chord of the hue circle, not along the arc. At weight 0.5 a 180° rotation lands exactly on grey, and a 90° rotation loses 29 % of its chroma, because the half-way chord has length |cos(θ/2)|.
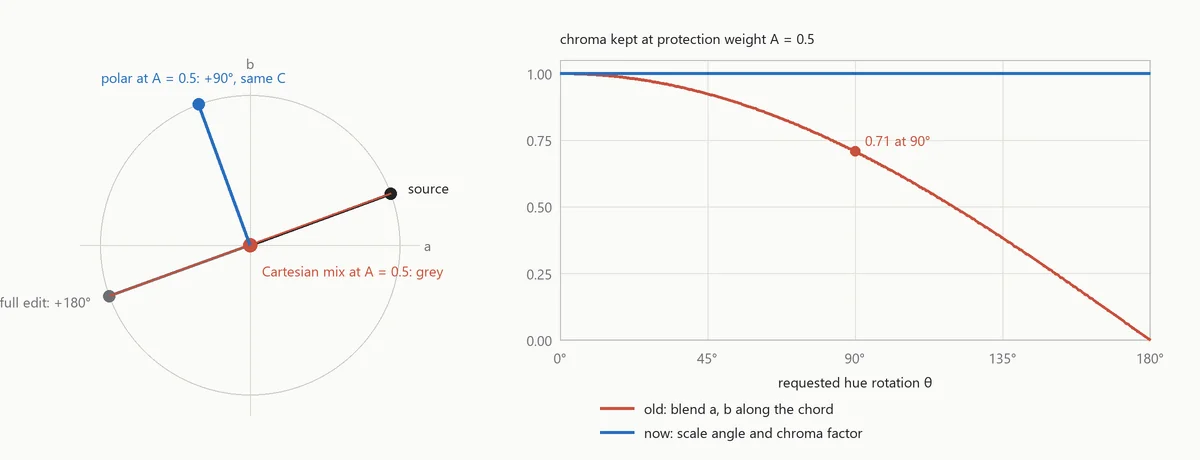
Five independent read-only reviews of the engine on 22 September found it twice: in the protection weighting of the global hue and saturation, and in the feathered edge of Selective Color. Both now scale the edit itself in polar form, angle A·θ and chroma factor 1 + A·(s − 1). The Selective Color version from photo_color.cpp:
// The feather scales the edit in polar form; a Cartesian mix cut across the hue circle.
const double newChroma = std::hypot(lab[1], lab[2]) * (1. + membership * selection.saturation);
const double angle = std::atan2(lab[2], lab[1]) + membership * selection.hue * kPi / 180.;
lab = {lab[0] + membership * selection.lightness, newChroma * std::cos(angle), newChroma * std::sin(angle)};
The check asserts that at membership 0.5 the chroma error is 3.9 × 10⁻¹⁶ and the hue turns by exactly half the request. The JavaScript implementation and the C++ engine are compared on the same inputs: the polar protection agrees to 6.1 × 10⁻¹⁵, the photo stage with polar Selective Color to 1.1 × 10⁻¹⁴.
Picking a colour instead of a sector
Sectors are coarse on purpose. For "this green, not all greens" there are two sampled tools.
Selective Color takes up to eight samples. Each has a radius in Oklab that counts L as well as a and b, full membership inside an inner radius set by a feather slider (half the radius by default), and a smoothstep fade to zero at the radius. Membership is computed once from the untouched source colour, so an earlier edit cannot change which pixels belong. The edit is L plus m·ΔL, C times 1 + m·Δs, h plus m·Δh, with an optional pull towards a target colour. A protected colour is a similar sample without an edit: inside its inner radius the original RGB comes back exactly.
Colour pins in the A/B grid go further: up to 24 anchors in the a/b plane, each either moved or locked. The interactive design mock-up for the studio pages added one compact kernel per anchor and summed them. With two anchors half a radius apart, A asking for Δa = 0.10 and B asking to stay, B moved by 0.10 × φ(0.5) = 0.019. The engine solves the kernel system instead: K c = d with K_ij = φ(‖p_i − p_j‖ / R) and the Wendland C² kernel φ(t) = (1 − t)⁴ (4t + 1). The field then passes exactly through every requested displacement, and a lock is a displacement of zero. The solve is O(n³) for n ≤ 24 and runs once per edit, not per pixel. Anchors closer than 0.001 R, or a system with a pivot below 10⁻⁵, are refused with an error rather than solved badly.
Limits
- Everything here selects in colour space, not in the picture. A beige wall and a beige cheek get the same treatment. The same fact makes it exportable: every tool in this part is a function of the input RGB alone and bakes into a
.cube, which is part 6. - There is no semantic skin mask, and no eight-range HSL panel with a commercial editor's range boundaries. Lightroom Classic's Color Mixer and Point Color showed me how useful it is to display the affected range next to the slider. I took that idea for the interface, not a formula.
- The path is SDR sRGB, with Oklab computed from linear sRGB at D65. Log, HDR and arbitrary ICC input are not supported.
- A strongly moved pin field can still fold two colours onto one. The Grid Lab limiter certifies the field against saturation and matching, but not yet against the protection weights; that case is an open ticket, not a solved one.
The next part is the channel mixer: a 3×3 matrix on RGB channels, where none of this perceptual machinery applies and the maths gets simpler and blunter.